|
The Orbit Editor is one of the most exciting features of
Starry Night Deluxe. Using it, you can add and edit new
objects in your virtual Solar System. For instance, if a
comet or moon has been recently discovered, you can use the
Orbit Editor to add it to Starry Night by simply entering
its orbital elements. The Orbit Editor also allows you to
add surface and atmosphere maps to your new objects.
Adding your own objects to the Solar system is a great
way to learn about celestial mechanics. The Orbit Editor
lets you view graphically the shapes, sizes, and positions
of a new orbit, as well as adjust these aspects in realtime
with sliders. This feature makes it clear what each
particular orbital element means, and how the orbit is
affected when adjustments are made.
This chapter is divided into two sections. The first will
give you a quick guide to the editor so that you can get on
with the job of adding new planets. The second section deals
with the editor in greater detail -- explaining all the
technical options.
- Note: The Orbit Editor Window
defaults to using an Ecliptic Orientation. As a result,
horizons are not shown. For more information, please see
the description
of Orientation in the
chapter Setting Menu.
Section 1
The Orbit Editor Window
To use the Orbit Editor, open the Planet Palette and,
using the Selection tool, select the body (the Sun, a
planet, or a moon) that you want to place a new object
around. Then press the Add button to open the Orbit Editor
Window.
The window opens with a default view of your new orbit,
as well as a series of tabs, each containing orbit options
and adjustable settings.
Starry Night calculates a preferred field of view for
each tab folder, one that reflects the function of the tab.
For example, for practical reasons, the view of your new
object from the Surface tab will be closer than that of the
view from the Orbital Elements tab.
- Tip: The Orbit Editor window is
a fully functional Starry Night window. You can use all
of Starry Night's commands and tools to adjust your view
of it.
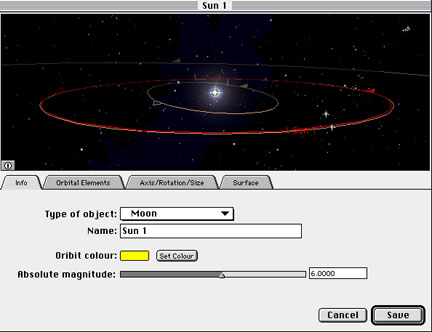
Info Tab
From within this tab, you can name your object, and from
a popup menu, choose the kind of object it will be. You can
also adjust the orbit color, and the Absolute Magnitude of
the object. (Absolute Magnitude is the brightness of the
object seen from 1 AU, with the Sun at a distance of 1
AU.)
Orbital Elements Tab
This second tab folder contains popup menus, sliders and
data input boxes which control the attributes of the new
orbit.
Style
This popup menu lets you choose the style of orbital data
that you'll be entering. It automatically defaults to the
style most common to the type of object you have selected in
the Info Tab folder. If you wish to change this, use this
popup menu.
Depending on the style chosen, you are presented with
sliders and/or data entry boxes into which you can plug in
your new object's orbital elements.
- Note: Comet tail lengths are
determined as a result of both absolute magnitude and
size of the comet nucleus (planet size).
Reference Plane
In order to specify orbits, or for that matter, the
position of any astronomical object, it is necessary to have
a reference system. There are two standard reference planes,
the equatorial plane of the Earth and the ecliptic plane
(the plane of Earth's orbit around the Sun). However, due to
precession, the equatorial and the ecliptic planes are
slowly changing their positions relative to the background
stars. Consequently, an astronomical reference plane is
dependent upon the time of the observations.
The popup menu allows you to select from ecliptic and
equatorial standards from which all of the orbital element
data are measured.
Ecliptic -- an ecliptic reference plane
based on the time of your current Starry Night window.
Ecliptic 1950 -- an ecliptic reference plane
based on the B1950.0 standards.
Ecliptic 2000 -- an ecliptic reference plane
based on the J2000.0 standards, established by the
International Astronomical Union (IAU) in 1976.
Equatorial -- an equatorial reference plane
based on the time of your current Starry Night
window.
Equatorial 1950 -- an ecliptic reference plane
based on the B1950.0 standards.
Equatorial 2000 -- an equatorial reference
plane based on the J2000.0 coordinates, established by
the IAU in 1976.
Axis/Rotation/Size Tab
Using these sliders and data boxes, you can enter
information about your new planet's rotation rate, pole
positions, and diameter.
Rotation -- These settings allow you to
establish how your new object will rotate.
Meridian Position -- sets the position of the
meridian line on the object, in J2000 equatorial
coordinates.
Rotation Rate -- adjusts the rate of rotation
that your new object will have.
Set Spin to Face Parent -- Over time, many
objects in the solar system become gravitationally
locked, that is, they keep the same face towards their
parent at all times. The Moon and Io are good examples of
this. Clicking this button will automatically "lock" your
object, that is, set its rotation to match its orbital
period.
Surface Tab
Within this tab folder, you can customize your new
planet's color, surface, and by adjusting atmosphere
settings.
Set Color
By default, the color of your new object is the same as
the parent object. If you wish to adjust this color, press
the Set Color button.
Surface maps
The two rectangular windows display the surface and
atmosphere maps of your new planet. They will be blank until
you copy and paste an image into them.
Adding images to your new objects can be a lot of fun.
Besides using the latest photos from space probes, you can
add any picture you like: your pet's, your family, a
corporate logo, you name it! Just copy any image to your
clipboard, then use the orbit editor to paste it onto your
new object.
- Note: Starry Night's Prime
Directive states that the major moons and planets that
ship with Starry Night cannot be edited using the Orbit
Editor.
No Atmosphere
This window displays the map used whenever "Show
Atmosphere" is not checked in Options>Planets>Surface
Drawing under the Settings menu.
With Atmosphere
This window displays the map used whenever "Show
Atmosphere" is checked in Options>Planets>Surface
Drawing under the Settings menu.
Copy and Pasting images
By using the Copy, Paste, and Clear buttons, you can
add and edit maps.
Copy -- This copies the contents of
the map window to your computer's clipboard. You can
use this feature to copy the maps of other planets if
you wish to add them to your new object. To do this
select a planet on the Planet Palette and push the
Open button that appears at the bottom of the palette.
Then go to the surface made and press the copy button.
Paste -- This pastes the contents of the
computer's clipboard into the map window.
Clear -- This clears the map window, without
copying to the clipboard.
The Orbit Editor can use almost any image as a planet
map, as long as you can copy it to the clipboard. It can
even use the images selected and copied with the picture
selection tool.
Image size and appearance
There is some restriction on size, the largest the
image can be is 1500 by 1500 pixels, the smallest it can
be is 25 by 25 pixels (if the picture is too big or too
small, your computer will beep twice and not allow the
paste). We recommend using images that are about 600
pixels long by 300 pixels high.
Whatever picture you do use, the width of it will be
wrapped around the planet, and the height of it will go
from pole to pole. Because it's being mapped on a sphere,
your image may be distorted in the northern and southern
latitudes. Keep the important parts of your image near
the "equator". Take a look at the images of the planets
or the comets (in the Orbit Editor or using the Location
window) to get an idea of how an object's map relates to
its appearance as a wrapped planet.
Seams on objects
If you have an image-editing program, such as Adobe
Photoshop, you can adjust your images so that the seam
(where the end of the pictures meet when wrapped on a
planet) is minimized or invisible. Select one end of the
picture (for example, the right third of the image), and
Cut it. Then slide the remaining two-thirds of the image
all the way over to the right. Paste in the first piece,
and position it so that it is now the left side of the
image. You should now have an obvious seam where the two
pieces are joined. At this point, you can use the
image-editing program to clean up the seam, blending the
two sides together so that the join is less obvious. Now
select the entire picture and copy it. Then, using the
Orbit Editor, paste it into your Starry Night object. The
place on your planet where the two sides of the image
meet should now be seamless.
Example: Adding a new planet between
the orbits of Mars and Jupiter
- Open a new window.
- Open the Planet Palette, then select the Sun.
- Press the Add button at the bottom of the Planet
Palette.
- The Orbit Editor Window will open, giving you the
default view of your new object's orbit. Since you've
selected the Sun, the default orbit is just past
Earth's.
- In the Info Tab, select "Planet" from the Type of
Object popup menu.
- Give your new planet a name.
- Adjust the orbit color and Absolute Magnitude if
desired.
- Open the Orbital Elements tab
- Using the Planet Palette, turn on Mars' orbit. (By
default, Jupiter's orbit is already on.)
- Use the elevation up button on the Tool palette to
rocket out just past Jupiter's orbit (about 10 AU's).
Here you'll have a better view by which to adjust your
new planet's orbit.
- Using the Mean Distance slider, adjust your planet's
orbit so that it lies in between Mars and Jupiter's.
Section 2
Understanding
Orbital Elements
Adjusting sliders and entering orbital elements into data
boxes is relatively easy. Understanding what these numbers
represent is a little more difficult. Orbital elements
remain a mystery to most people, due in part to the complex
names these numbers have acquired, and secondly to the
trouble many people have in thinking three-dimensionally. To
make matters even more complicated, often an orbital element
will have several different names.
Orbital Elements
Several numbers are required to establish an object's
orbit. These orbital elements, first defined by Johannes
Kepler at the turn of the 17th century, place an object on
an elliptical path at a particular time, and orientate it
about a parent body.
- Note: The real world is
slightly more complex than the Keplerian model, since
there are other factors that can influence an orbit,
including the gravitation influence of other planets,
gravity anomalies of the parent, and atmospheric drag on
an object if it is in a low orbit.
Mean Distance / Mean Motion / Pericenter Distance: How
far away is the object from the parent?
Kepler's third law of orbital motion gives us a precise
relationship between the speed of a satellite and its
distance from the parent. Objects that are close to the
parent orbit quickly, while objects farther away orbit more
slowly. The implication is that if we specify either the
speed at which the object is moving or its distance from the
parent, we've measured similar values. In effect, Mean
Distance and Mean Motion are two ways of describing the same
thing.
The convention with planets is to call this number the
Mean Distance. Planets in circular orbits would travel at a
constant distance from their parents, but since most
planetary orbits are elliptical, this distance is constantly
changing. The common practice is to average this distance,
and record it as "Mean Distance". It is usually given in
units of AU.
The convention with satellites is to call this number the
Mean Motion. Satellites in circular orbits travel at a
constant speed, but since most orbits are elliptical, their
speed is constantly changing as they orbit. The common
practice is to average the speed, call it the "Mean Motion",
and record it in units of revolutions per day.
Comets orbits are extremely elliptical, so the distance
between comet and parent body is usually measured at
pericenter, the point in their orbit where they are closest
to the parent. This distance is called the Pericenter
distance, and is given in units of AU.
Pericenter distance is also often called Perihelion
distance (for objects in orbit about the Sun).
Inclination: The tilt of the orbit
The orbit's ellipse shape lies in a plane known as the
orbital plane. The orbital plane always goes through the
center of the parent object, but may be tilted at any angle
relative to the parent's equator. Inclination is the angle
between the orbital plane and the equatorial plane, measured
between 0ű and 180ű. If the orbit lies in the ecliptic
plane, the inclination is 0ű. At 90ű, the orbit is
perpendicular to the ecliptic, while an inclination of
greater than 90ű describes a retrograde orbit.
Satellites with an inclination near 0ű are called
equatorial orbits (because the satellite stays nearly over
the equator). Those whose orbits are inclined near 90ű are
called polar (because the satellite crosses over the north
and south poles).
- Nerd stuff: Spy satellites are
often polar orbiting. In this inclination, they can
examine all parts of the Earth as it rotates underneath
them.
Ascending Node / Right Ascension of Ascending Node:
Where the orbit cross the ecliptic equator
This measurement specifies the point at which the orbit
crosses the ecliptic plane on the ascending node (where the
object crosses up through the ecliptic plane going from
south to north).
For satellites, the convention is to specify the Right
Ascension of the Ascending Node. The RAAN of a satellite's
orbit is the angle (measured at the center of the Earth)
between the vernal equinox and the place where the
satellite's orbit rises up through the equator.
The ascending node is also sometimes called the Longitude
of the Ascending Node.
Argument of Pericenter/Perigee: The orbit's closest
point
The pericenter of a planet is the point on its orbit that
it is closest to the Sun. The Argument of Pericenter
describes where on the orbit the pericenter will be, and is
measured in degrees.
The point where a satellite is closest to the parent is
called the perigee, so, for satellites, the convention is to
specify the Argument of Perigee.
The value is determined by measuring the angle (measured
at the center of the parent) from the ascending node to
pericenter/perigee. For example, when the Argument of
Pericenter is 0ű, the pericenter occurs at the same place as
the ascending node. That means that the planet would be
closest to the Sun just as it rises up through the ecliptic
plane. Likewise, when the Argument of Pericenter is 180ű,
the planet, as it rises up through the ecliptic plane, would
be at its farthest from Sun.
Eccentricity: The orbit's shape
Eccentricity describes the shape of the orbit, based on a
ratio of the distance of the focus from the center of the
orbit's ellipse to the length of its semi-major axis. A
circular orbit would have an eccentricity of 0, while an
extremely elliptical orbit (such as a comet's) would have a
value close to 1.
Mean Anomaly: Where the new object is located
Mean anomaly is used to describe exactly where on the
orbit the new object is located, at the specified time. It
is measured as an angle over one revolution, starting at 0ű
at pericenter/perigee, with 180ű at aphelion/apogee.
Epoch: When the orbit is defined
A set of orbital elements is a portrait of an orbit, at a
specific time. The Epoch specifies this time. In most cases,
this time is expressed as a Julian date, however NASA has
its own epoch system that is commonly used for describing
satellite orbits. Its format lists the year, the number of
days, then the percentage of the day. For example 1997045.5
would translate as February 14th, 1997, at 12 hours UT.
Additional satellite-related elements
Decay Rate describes the effect on a satellite when it
collides with particles in the Earth's upper atmosphere.
This friction causes satellites to eventually spiral
downward, and as they do, they speed up. The Decay Rate
orbital element simply tells us the rate at which Mean
Motion is changing due to this drag or other related
effects.
Its units are in revolutions per day per day (meaning
every day, the satellite gains so many revolutions per day)
and is typically a very small number.
Orbit Editor Hints
Sources for orbital elements
Orbital elements for comets, asteroids, or satellites can
be found in magazines such as "Sky & Telescope" and
"Astronomy", or on the World Wide Web. Check Sienna's web
site for links
to sites which contain recent orbital element data.
Converting dates for use in the orbit editor
The Orbit Editor requires you to input dates as Julian
dates or NASA epoch dates. If the original date is in
"ordinary" format, there is an easy way to convert it to a
Julian date or NASA epoch. Start by plugging the ordinary
date into the Time floater, then hit the Set Julian button.
Copy the Julian date from this dialog box, cancel the
dialog, then go back to the Orbit Editor and paste in the
Julian date from the clipboard. To find the NASA epoch,
switch to the AMSAT style, and the date will automatically
be converted for you.
You can also perform similar actions in order to convert
a Julian date or NASA date to a normal date. Plug your NASA
epoch into the appropriate AMSAT data box, then switch
styles to Pericentric. Copy the Julian date from the Epoch
data box, then press the Julian button on the Time Palette,
paste in the new Julian date, then set the time. The Time
Palette will then display the Julian date as a normal
time.
Orbit Editor Calculations
You may notice that some numbers you enter may change
when switching between different styles. For instance, if
you've entered 485ű in an Ascending Node box, move to
another style, then return, the number will have changed to
125ű. Starry Night has recalculated the number, but in
effect, the value of the orbital element remains the same.
The new number displayed is mathematically equivalent to the
original number that you entered.
You also may notice that sliders may change when
adjusting certain elements. This is because Starry Night is
recalculating these sliders to enhance the user
experience.
For instance, if you adjust the Rotation rate of an
object using the sliders, the Meridian slider will jump to a
new position. (Note that the Meridian drawn on the object
has not moved). Starry Night has recalculated the Meridian
position to keep it synchronized with J2000 standards.
- Note: Data box entries are not
recalculated in such a fashion.
Working with satellites close to the Earth
On slower computers, if you are creating a satellite
close to the Earth, you may wish to increase performance by
turning off detailed surfaces and phases in the
Settings/Options/Planets menu.
|

