|
Among the most popular objects for amateur astronomers to
find in the sky are the Messier objects. These were plotted
by comet-hunter Charles Messier in the late 1700s. He wanted
to catalogue the various "fuzzy" objects in the night sky,
so as not to confuse them with the short-lived comets he was
trying to discover.
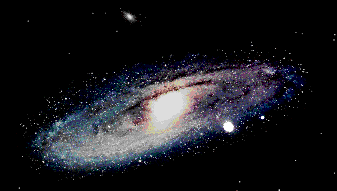
Starry Night displays these star clusters, nebulae, and
galaxies by using actual photographs. In the normal field of
view, the larger Messier objects can be seen as hazy
patches, similar to what one observes on a very clear and
dark night. (Fainter Messier objects are plotted as a small
yellow spiral.) Zooming up towards a particular Messier
object lets you see what it looks like when photographed
using long exposures and/or large telescopes. Some of the
Messiers are displayed in color, however even with the very
largest telescopes, one sees very little color or fine
detail. These beautiful images are possible only through
photographic enhancement.
The Messier objects can be toggled on and off via the
Display menu or palette.
Messier Options
To change the manner in which the Messier objects are
shown in Starry Night open the Options dialog by selecting
"Options..." from the Settings menu, then pick "Messier"
from the popup menu. Alternatively, click the options
button for the Messier objects in the Display
palette.
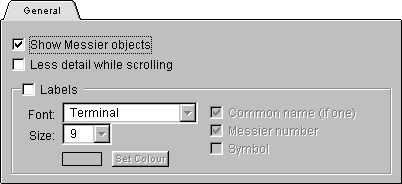
Show Messier Objects: Checking this box allows
Starry Night to display the Messier objects.
Less Detail While Scrolling: To improve
performance, you can check this box so that the Messier
objects are turned off while scrolling.
Labels/Icons: Checking this box turns on Messier
object identification, and allows you to adjust the way
Messier objects are displayed. You can also adjust the Font
and Font size of the Messier object names using the popup
menus.
Messier Number: Messier objects are numbered from
1 to 110. Checking this box will display the object's
catalogue number.
Common Name: Many Messier objects also have common
names. If this box is checked, they will be displayed.
Symbol: Checking this box will display a symbol
representing the Messier object in its position.
Scale to Size: If this box is checked, the symbol
used to represent a particular Messier object will be scaled
to the approximate angular size of that Messier object.
Font and Size: Use these popup menus to change the
font and font size of Messier objects.
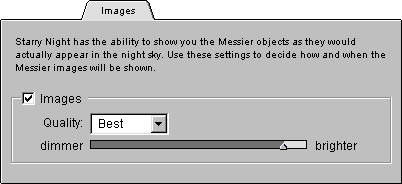
Images: If you zoom up towards a Messier object,
you will find a telescopic image of that particular object.
The following controls enable you to adjust how this image
is displayed.
Quality: This popup menu allows you choose how the
image will be displayed. For increased performance on slower
machines, you may want to try switching to draft or better
quality images.
Slider Control: The slider lets you adjust how
bright the Messier object's image is on the screen. Using
this control, you can adjust the object so that its
brightness appears as it would through a backyard telescope
(as a very dim image), or as captured by a long exposure
observatory photograph (a much brighter image).
- Note: In 256 colors, this
slider is disabled. However, you can adjust the
brightness somewhat by switching between "draft",
"better", and "best".
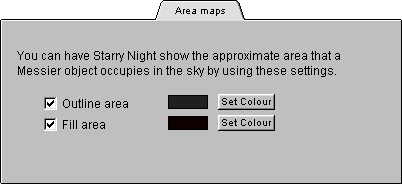
You can have Starry Night display the approximate area
each Messier object occupies in the sky by using these
checkboxes.
Outline Area: When this box is checked,
the area that any particular Messier occupies is
outlined. You may adjust the color of this outline by
pressing the Set Color button.
Fill Area: When this box is checked, the area
that any particular Messier occupies is filled. You may
adjust the color of this fill by pressing the Set Color
button.
|

