|
|
|
The Mouse Info Palette

To see the Mouse Info Display click on the Mouse Info
button on the Tool Palette or select Mouse Info from the
Window menu. This floating display constantly updates the
position information of the tool currently in use. Placing a
cursor anywhere in the current view will give you equatorial
guide information (Declination (DA) and Right
Ascension(RA)), local guide information (altitude and
azimuth), and indicate which constellation the cursor is
currently in. If a tool is placed over any planet, moon, or
major star, this window will also tell you the name of that
object.
The Get Info Window
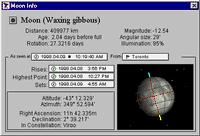
This feature is a simple yet powerful way to get
information about the various objects and constellations in
our sky. To use it, select a planet, Messier object, Deep
Sky object, comet, or constellation by using the Selection
tool or the Constellation tool. Then select Get Info from
the Edit menu, or use the Contextual popup menu (see below).
The Get Info window will appear, displaying information
about the object selected.
The Get Info window will inform you as to the rise and
set times, highest point, altitude/azimuth, RA and DEC, and
the constellation in which the object resides. Planet
information includes distance, length of year, rotation, and
magnitude. For Messier objects, the window will display
their NGC number, Object type, and angular size. In the case
of stars, the information also includes the SAO number,
color index, spectral class, proper motion RA and DEC, and
radial velocity.
- Note: Objects that are
currently circumpolar will have no rise or set
time.
The Get Info data is based upon the observing time and
the observer's location. If you change either of these, the
Get Info window will automatically update any relevant
data.
The Viewport
Get Info also has a small window known as the Viewport,
that shows the object you have selected. This remarkable
little window is a fully functional Starry Night view; that
is, you are able to use all the Tools, Time controls,
Guides, and Settings to navigate within it.
Time and location information is displayed in small
rectangular boxes. Clicking on these boxes (or dragging them
into the Viewport) instructs the Viewport to show you your
selected object at that particular time or location. The
Viewport also accepts time and location information from the
lower left hand corner of other Starry Night windows. In
this way, you can rapidly synchronize the times or locations
between Viewports and other open window views. See the
Working with Multiple Windows
chapter for more information.
If the screen appears black it may be that are zoomed in
too far. Try zooming out by using the zoom tools on the Tool
Palette.
- Tip: If you've been navigating
within the Viewport, and you wish to center your object
again, just click the target icon beside the object's
name (or drag and drop the icon into the Viewport).
Holding down the Alt key (Windows) or the Option key
(Macintosh) as you click or drag the icon will zoom up to
the object.
Contextual Popup Menus
Starry Night now incorporates contextual popup menus. To
access these, use either the Selection tool or the
Constellation tool. Place the tool over an object, and
right-click with the mouse (Windows) or hold the mouse
button down (Macintosh). A popup menu listing several
options will appear.
Depending on the object selected, you can use these popup
menus to select, deselect, center, and open the Get Info
window. For planets, you also have the option of showing
orbits, local paths, and celestial paths.
Angular Separation
If, while outside observing, you are trying to find a
small or dim object in the sky, it will often be helpful if
you know how many degrees separates it from a brighter, more
familiar object. This is a very easy thing to do using the
Angular Separation tool on the Tool Palette. Simply select
the tool, then drag it between the two objects you'd like to
measure. As you drag, the distance that the tool is
measuring (in degrees, minutes, and seconds) is
displayed.
As you begin your drag on an object, its name will
appear, as will the name of any object you happen to be
dragging directly over. This makes it very convenient to
find the exact angular separation between two small objects
such as stars.
When measuring angular separation near or in the area of
a Messier object or NGC object, the tool will automatically
begin its measurement from the center of that object. If you
wish to disable this feature (for instance, when measuring
between two stars within a Messier object), just hold down
the Alt key (Windows) or the Option key (Macintosh) as you
take the measurement.
- Cool effect: Sky distances can
be roughly measured by using another conveniently located
measuring instrument -- your hand. If you hold your hand
at arm's length, the width of your little finger is about
1 degree. Three of your fingers combined together spans
approximately 5 degrees, your fist about 10 degrees, and
your outstretched hand from thumb to little finger is
around 25 degrees. These "handy" measurements work for
male and female, young and old.
Using this hand technique in combination with angular
separation information from Starry Night can help you locate
small or dim objects.
You can also check the width of the moon. While looking
at the Moon, try to estimate how many degrees it's disk
covers. Then hold up your hand at arms length to discover
it's only half as wide as your little finger (half a
degree)! Most people imagine the moon to be much larger. In
fact there is a check box in Preferences under the Settings
menu to enlarge the moon's size when viewed from Earth.

|